
How to Use Google Forms to Automate Your Marking
Three years ago, I was looking into how I could reduce my marking workload. I loathe marking tests and its one of the most time-consuming tasks that come with the job. I couldn’t help but think about how I could better spend my time doing other things aside from marking. During my research I came across a blog that suggested getting your students to mark more of their own work, a suggestion I immediately implemented. While this did reduce my workload, I was still marking tests. There are paid options out there; however, I didn’t want to waste money when I could potentially solve the problem for free. During my conversations with teachers about this ‘hot topic’ I stumbled across Google Forms and how some teachers had used this web-based application to automate the marking process. The problem with their blogs is that they just said they used it to reduce their marking workload without saying what they did and how they set up their Google forms.
So here is my blog, a step by step walk through about how you can use Google forms to automate the marking of tests.
Creating Your Google Account
The first thing you will need to do is to open a Gmail account. By doing this you will gain free access to a 16GB cloud based hard drive and all of Google’s applications, including Google forms. You can also download Google Forms and Google Drive from the Google Play store for Android devices or from the App Store for iOS.
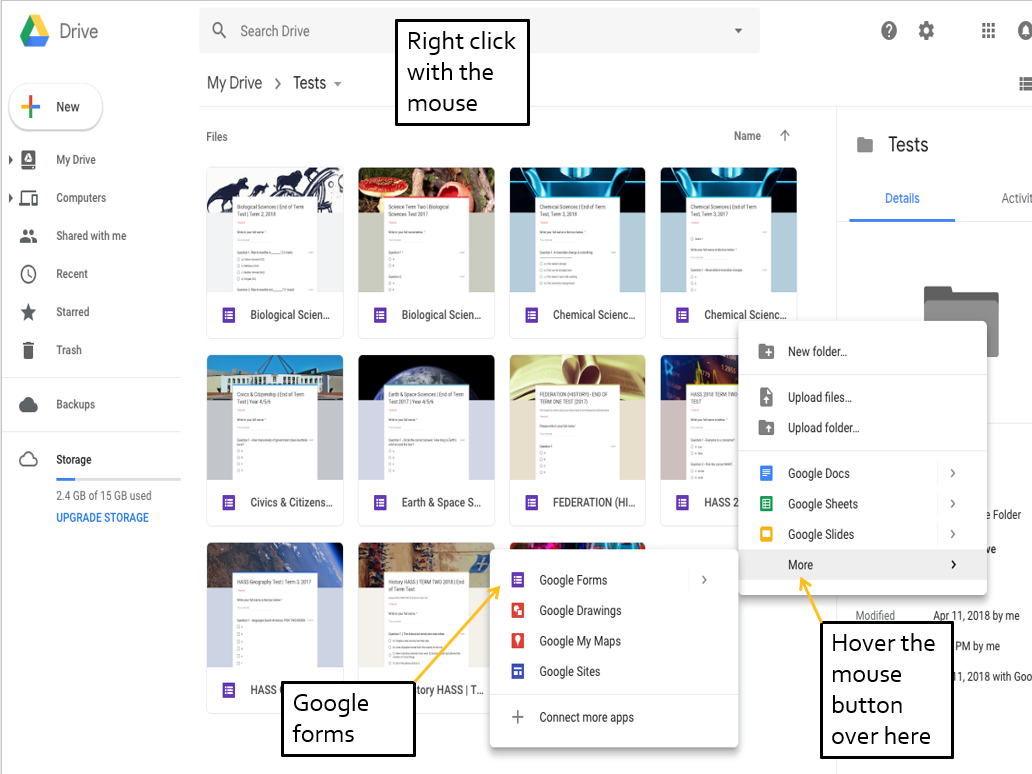
Congratulations, you now have a Google account. So where to from here? Once you load up Google.com in the top right-hand corner you will see a series of nine square dots. Click on them and then click on the Google Drive icon.

Then you will be taken to your Google Drive’s homepage. Simply right click underneath ‘quick access’ or ‘folders’ and a menu will appear. Hover over the ‘more button’, move over and then click on Google Forms.
Configuring Your Google Form for a Test
Upon opening Google Forms for the first time you’ll be greeted with an ‘untitled form’. The first thing you should do is to write down the name of your form in the top left-hand corner. After pressing enter, the name of your form should also appear in the title box at the top of your form.

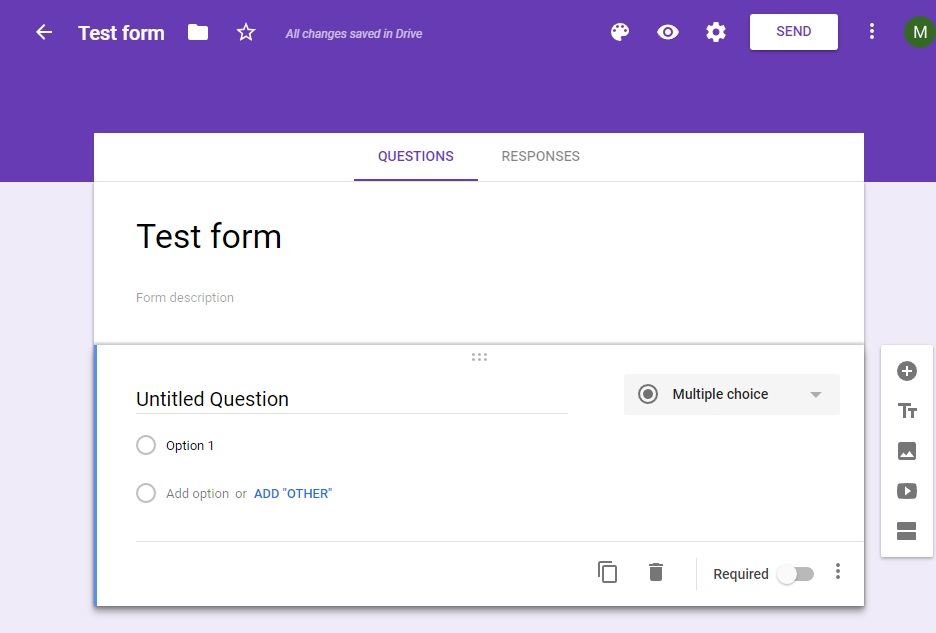
Next, we need to configure the Google Form to prevent any students from redoing their test and to stop them seeing which questions they got wrong. In the top right-hand corner, you will see a gear icon. Click on this and then a settings page will pop up. Personally, I don’t bother ticking any boxes in the ‘general’ tab as I don’t require my students’ email addresses. I also make sure that they cannot edit after submitting and that they cannot see any summary charts and text responses.

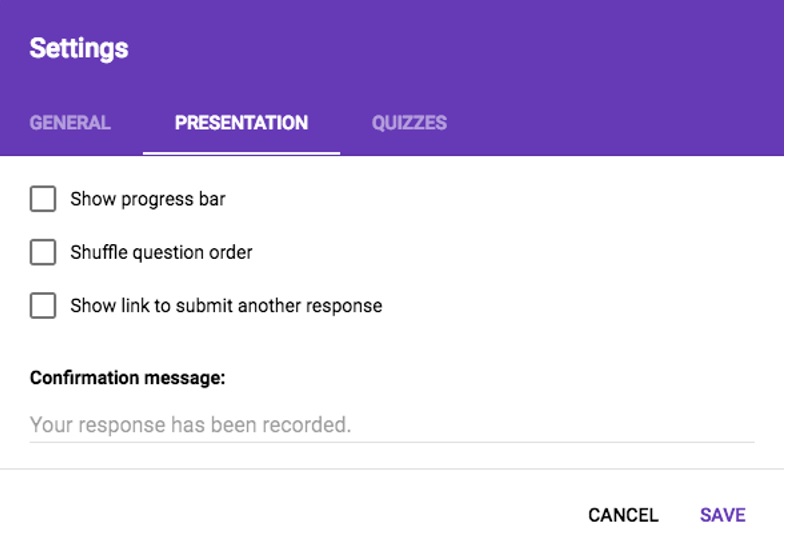
In the ‘presentation’ tab the small check box ‘show link to submit another response’ will automatically be ticked. Make sure this is turned off to prevent your students from retaking the test. You can also change the confirmation message at the end of a test to something like ‘I hope you double checked your work’ or ‘thanks for completing the test’.
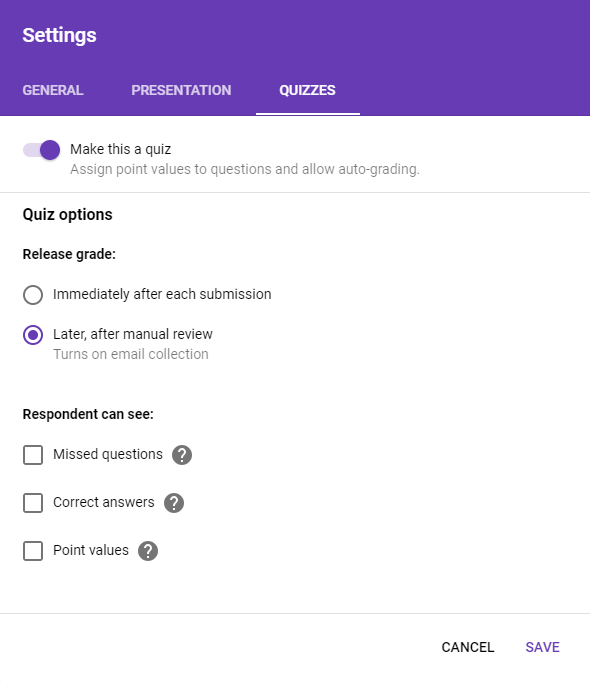
The quizzes tab is the most important part of Google Forms. Slide the tab over to ‘make this a test’ to assign point values to questions. Next, under ‘quiz options release grade:’ make sure you click on ‘later, after manual review’. Then immediately go back to the ‘general’ tab and turn off ‘collect email addresses’ as this will be automatically tick on after doing this. For primary school students and for me personally, I know this is an unnecessary procedure. I also don’t want them to know their grade unless I have marked all the work. Go back to the ‘quizzes’ tab and unclick ‘missed questions’, ‘correct answers’ and ‘point values’ and remember to press save.
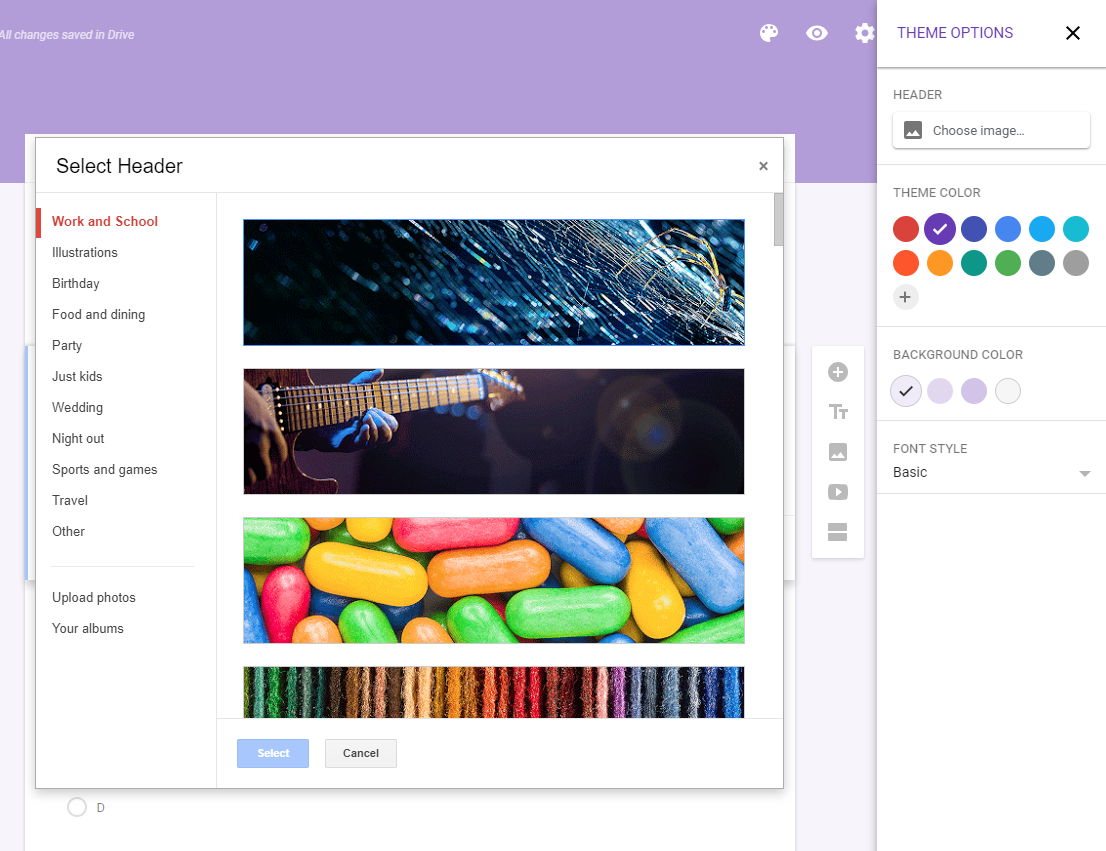
After clicking ‘save’ you will see what looks like a wooden board with splotches of paint on it called ‘customise theme’. If you get bored of the generic purple colour theme you can change it to something else, upload a different picture or upload your own picture to make your Google Form a little bit more appealing to the eye.
Congratulations, you have just successfully configured your first Google Form.
What Types of Questions Can You Use?
There are several types of questions that you can include in your Google Form. I’ve only bothered to include: short answer, multiple choice and checkboxes within my tests.
Short Answer Questions
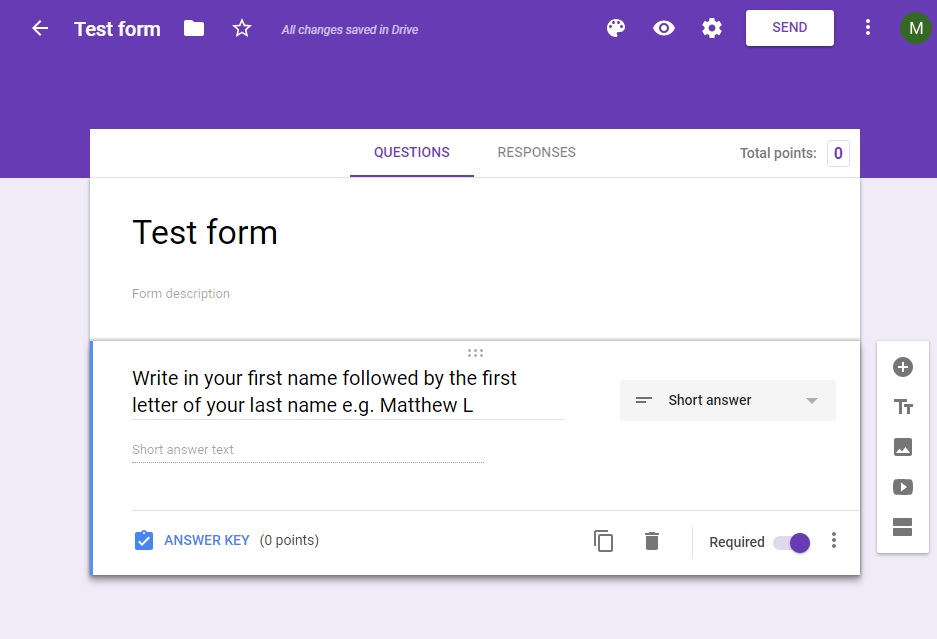
Firstly, you will need to include a section for students to write in their name. To do this, make your first question a ‘short answer’. To prevent students from handing in a test with no name, then click on the ‘required’ slider button. With concerns about data and privacy, I suggest you get your students to write in their first name followed by the first letter of their last name. I am certain that any data on Google Drive is not stored within Australia, and therefore, is not subject to Australia’s privacy laws.
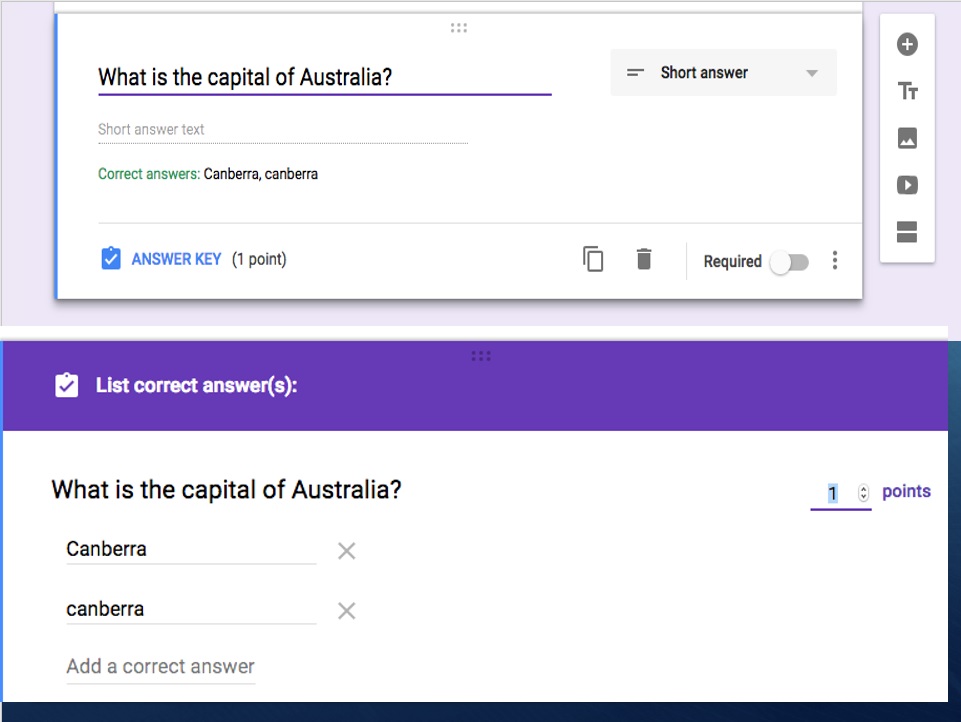
Short answer questions can also be marked automatically. For example, I included a question about Australia’s capital city in one of my HASS tests. As long as you have specified a range of potentially correct answers e.g. ‘Canberra’ and ‘canberra’ this will be marked automatically for you. I would not use the automatic marking feature for short answer questions that are longer than two words.
Multiple Choice Questions
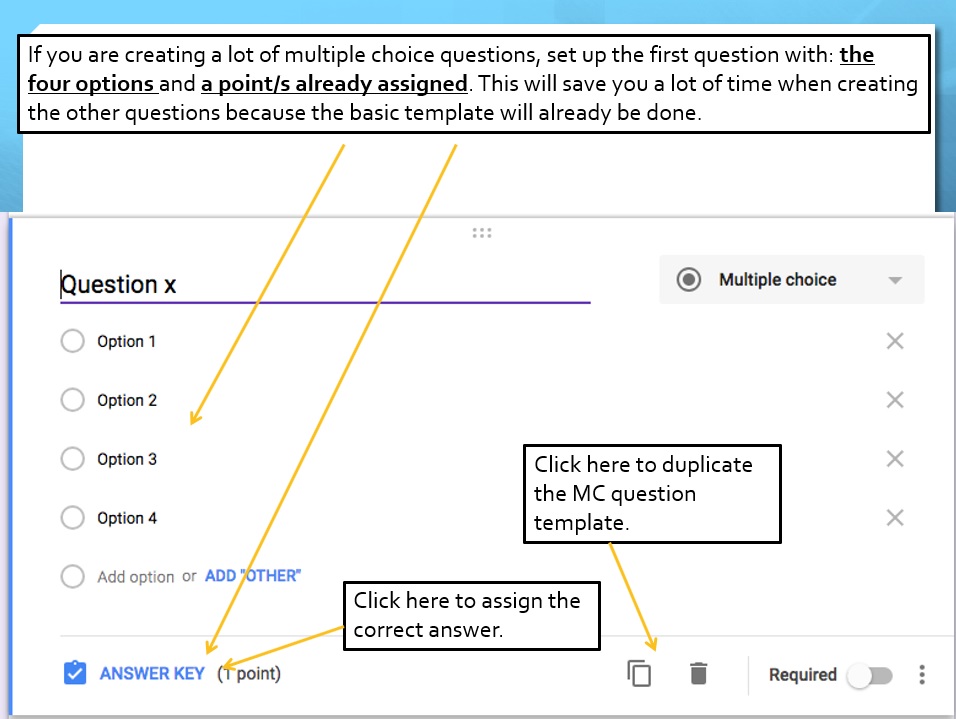
Where Google Forms really shines is with its multiple-choice questions where you need to pick one correct answer from four possible options. I’ve also got a time saving tip for you especially if you are creating a lot of multiple-choice questions. Set up a generic multiple-choice template with: 1 point already allocated, four possible options (a,b,c or d) and a title for each question e.g. ‘Question x’. Click back on ‘edit question’ and then click on the ‘duplicate’ button. This way any repetitive actions will have already been completed while you are creating your questions.While you do have the option to allocate more than two correct answers the user can only pick one answer when completing the form. If you require a question where a student needs to pick more than one answer, then you will need to create a ‘check box’ question type.
Check Boxes
Check boxes are used for questions where you need to allocate more than one correct answer or when a student needs to pick from a list of possible answers. There is one downside to this questioning method and its this. Imagine you allocate 4 marks to a check box question. This question has 8 possible answers but only 4 of them are correct. If a student got all of them right, then they would receive the full 4 marks; however, if they received lower than 4 then none of the correct answers would be counted towards the total. You would then have to go into the responses section and then add on any correct answers to their final score.


Configuring the Automatic Marking Process
At the end of each question you will need to allocate a correct answer. To do this, click on ‘answer key’ and then click on the correct response. Make sure you allocate a score to each question as well. You can also add feedback to each answer; however, I have never bothered to use this option.

Once you have finished your Google Form then click on the preview button and proof your test. After submitting your answers then click on the responses tab on top of the form. Here you can see if you accidentally allocated a mark to an incorrect response. If you pick up on a mistake after the students have completed a test, then don’t worry. Simply change the question and Google Forms will automatically remark your work! You won’t need your students to retake the test or complete this question again.

Distributing the Form to Students
Once you have proofed your Google Form and made sure that it is 100% correct, then you need to click on the ‘send '. You can distribute the form via: an email address, a URL link or via Embedded HTML. I personally the URL link and upload that to Connect. You could also upload this link to another website where students are required to access digital content such as Seqta.


Recommended Testing Procedures and Protocols
It is very important that you get your testing procedures right to prevent students from Googling the correct answer. In the absence of a program that ‘locks’ a student into a browser I suggest the following procedures.
Students can type in their name, but they must wait until everyone has the Google form up on their screen.
Make sure students only have 1 tab open in their Chrome browser before starting the test
Walk around the room during the whole test to ensure that students don’t look up the answer. It will be obvious if they have decided to look up the answer if you are maintaining an active presence in your classroom.
Once a student has completed a form, get the students to show you that they have entered in their name correctly before pressing submit. Then make sure they have closed down Chrome.
Once the test has been completed make sure you either delete the link or make it hidden. You will also need to turn on ‘not accepting any more responses’ within the responses tab as well.

Benefits of Immediate Feedback
Not only is Google Forms an incredible time saving resource it is also fantastic for providing immediate feedback. Assuming all your students have completed the form, then you can show them how they went in the test. Once you click on the responses tab you can view the class summary, how the class performed with each question and how well each student performed. I only use the summary and question tabs when showing this to the whole class. The summary is great for provided important data such as the average, median and range. The question tab is where Google Form stands out.


Most students can remember what answers they put into a question just after a test. By showing the classroom how they went, students will automatically think back to their answers and evaluate their performance. Don’t worry, they cannot see each other’s score. This is where you can immediately correct any mistakes, especially if you want to retest the students at some point. I used this process of completing a form, provide immediate feedback and then complete another similar form for the previous year 5 NAPLAN language and conventions tests. This strategy yielded powerful results with some students scoring in band seven for language conventions. Not a bad result for a year five student.

Conclusion
I am so glad that I started this journey three years ago. I conservatively estimate that I’ve not marked 5,760 multiple choice questions from the HASS and Science Google Forms I created. What’s more, I’ve eliminated any chance of human error during the marking process where ‘brain drain’ might set in. Please keep this conversation going on social media. I am looking forward to hearing from anyone who was has attempted to use Google Forms in the classroom.
Similar Articles by Other Teachers
If you found this blog interesting then head over to Big Red Science and read about her ‘1 Grading Hack’. I know I found her content useful and I’ve implemented her recommendations.


If you think this website is awesome then please ...
Bookmark this page.
Follow us on Instagram | @griffin_edu
Like and follow us on Facebook | @griffineducationenterprises
Follow us on Twitter | @Griffin_Edu
Follow us on Pinterest | Griffin Education Enterprises
Join our mailing list down below.
Consider supporting us on Patreon.
And most importantly, share this website with other educators!
Concerned about what precautions you should take to protect your professional image? Then read this blog to find out how.